
What Is A Charcuterie Board? - Issue #59
Hey there, Food Lovers!
It's video week this week - so check out our latest video which has just been published. You can read more about it later on in this newsletter. I hope you enjoy the tips for putting together a stunning charcuterie board, and learning how to give your presentation a 'wow' factor by making a salami rose or using simple meat folding techniques.
Following on from our special meal I mentioned in a previous newsletter, a few of you have asked about the potato stacks I made in muffin tins. I'll share the recipe with you and tell you a bit more about it below so you can enjoy them too.
Lastly in this newsletter I'll tell you about our online shop that we've been updating over the last few weeks. Sometimes having the right tool for the job can be a great advantage when you're making and presenting food nicely.
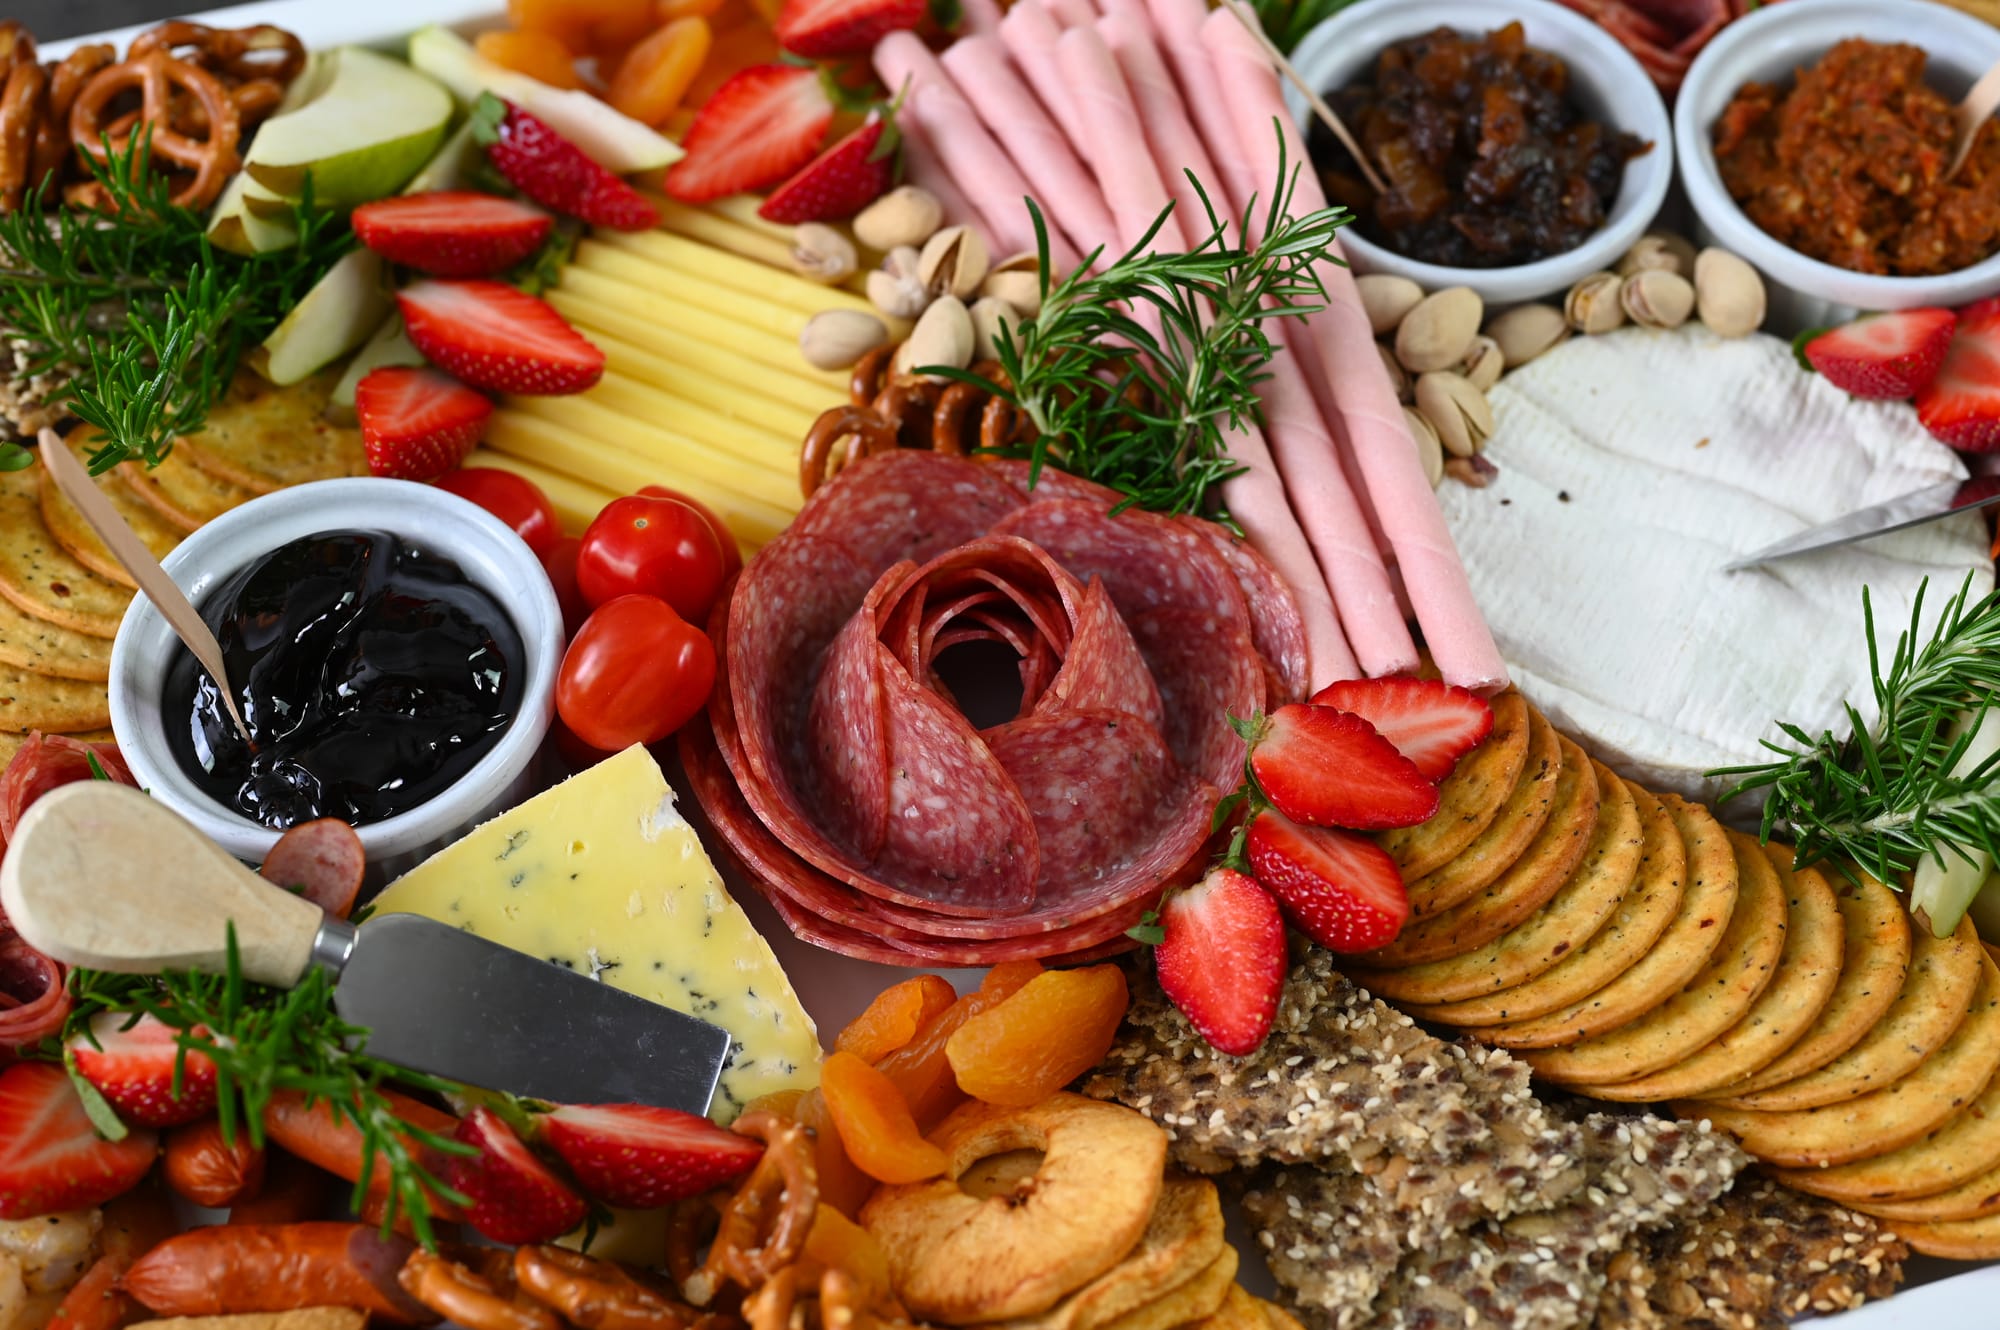
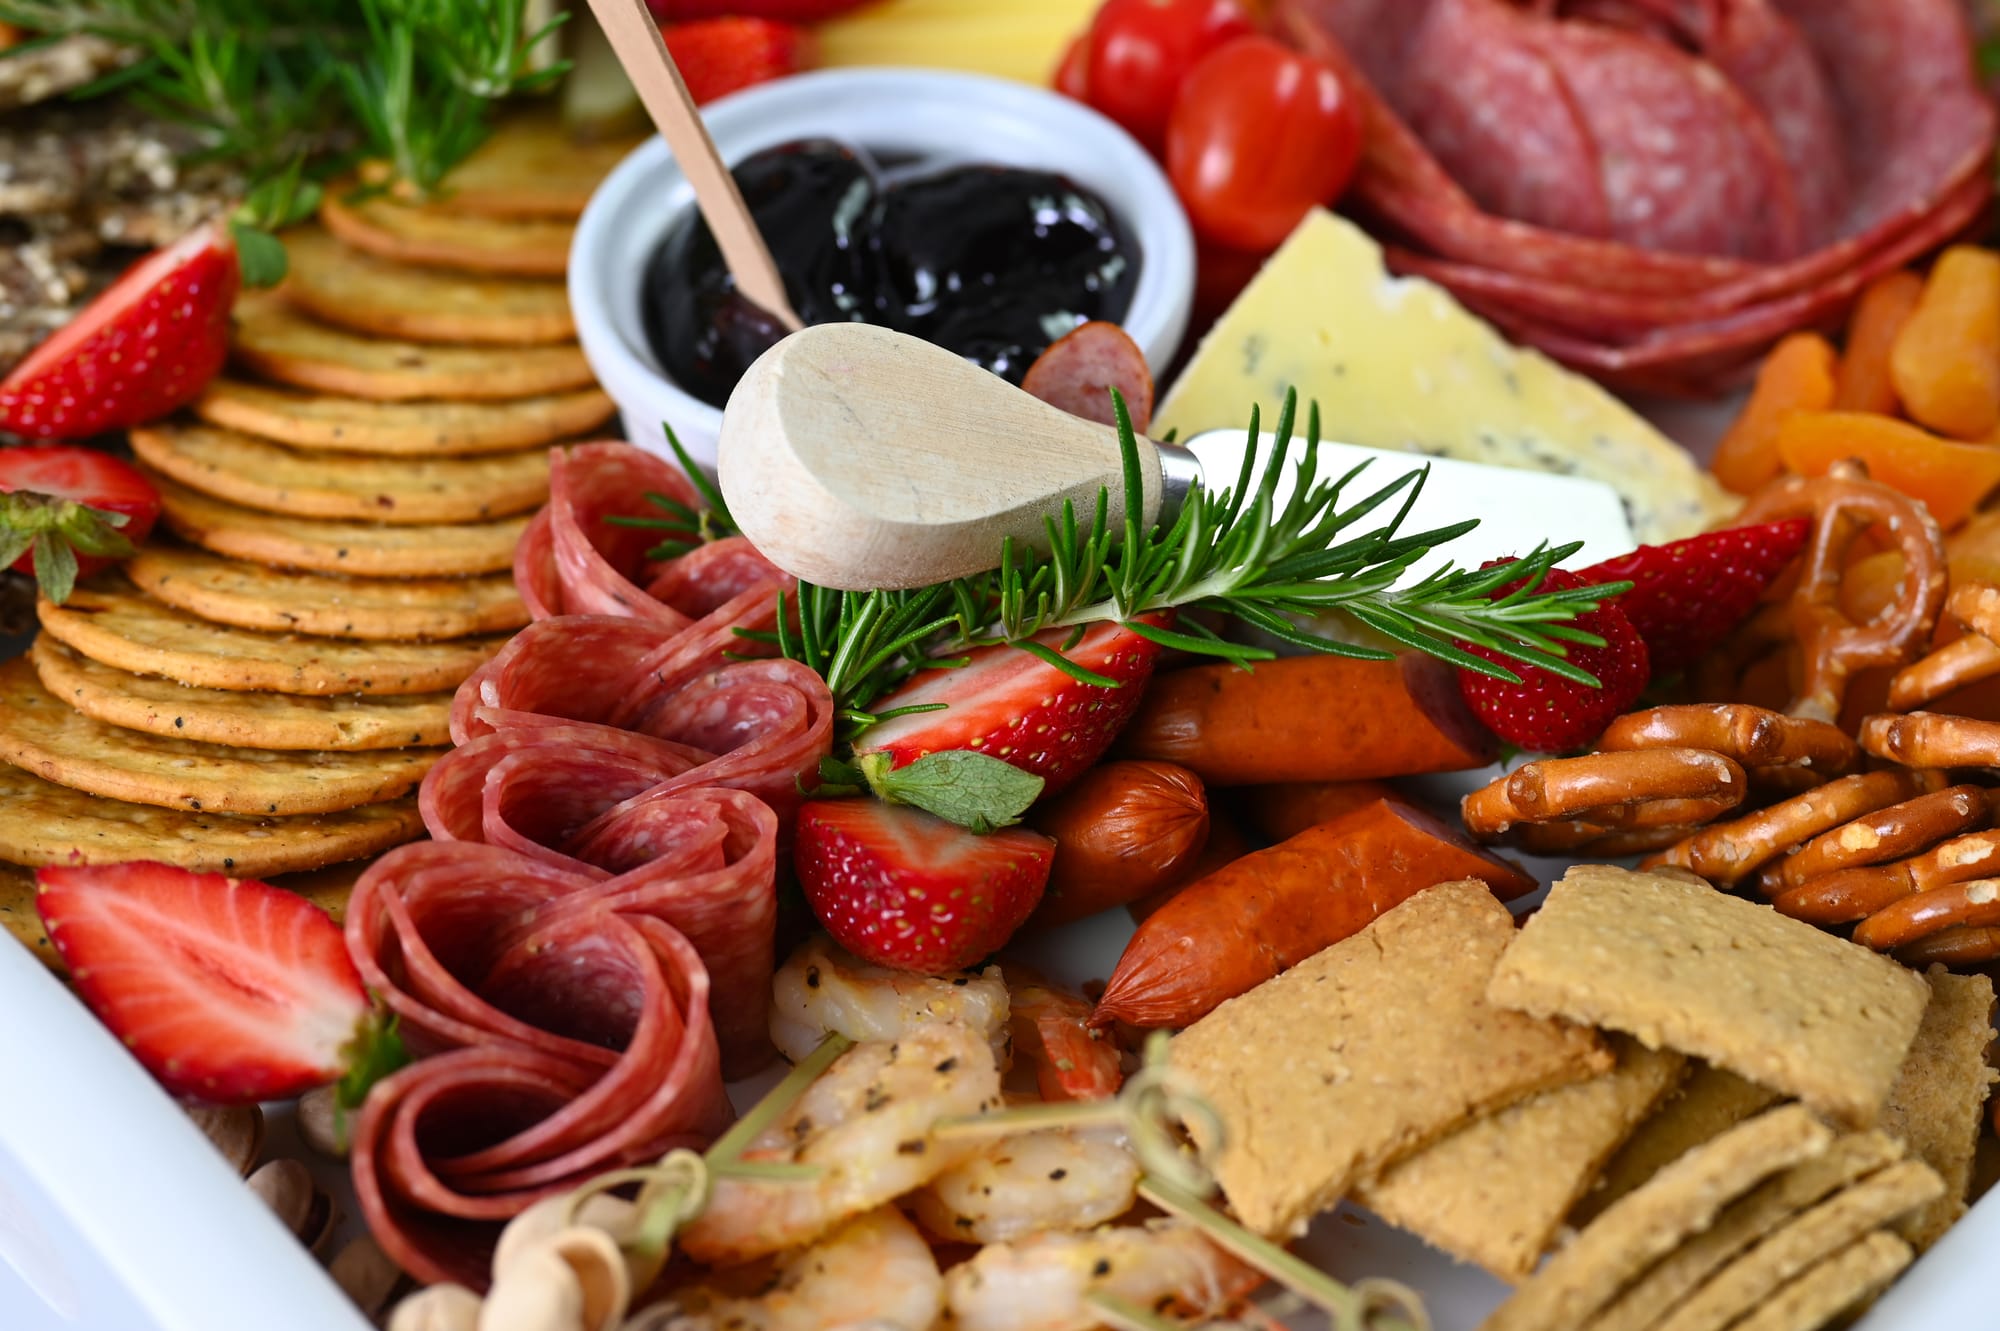
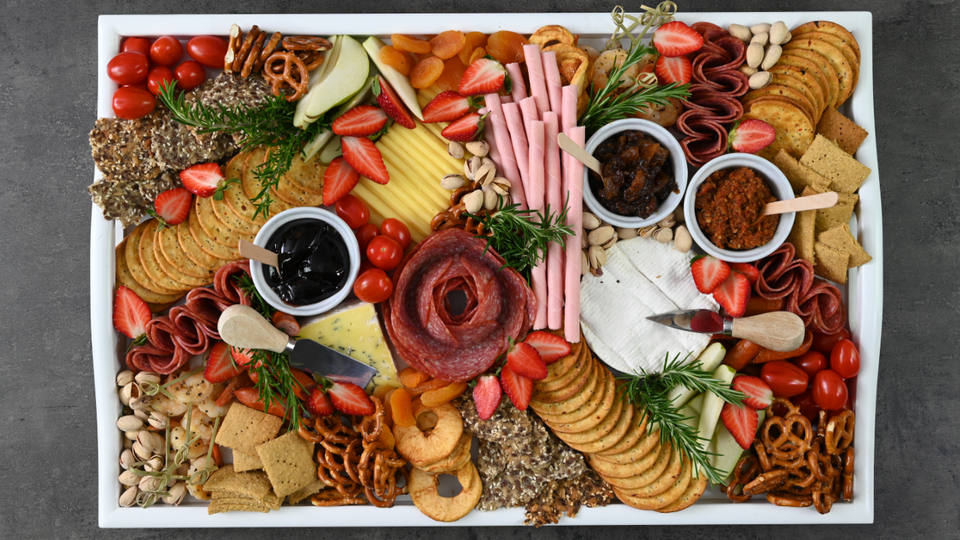
Salami rose and meat folding idea.
In this issue:
- Fresh off the press - Charcuterie Board's are easy and look WOW!
- Inspiration from my kitchen - Layered Potato Stacks
- Something new - Our Online Shop
Fresh off the Press...(+ Recipes)
Our latest video - Charcuterie Board's are easy and look WOW! - has just been published.
I find any excuse, big or small to put together a charcuterie board. Whether it's for a casual afternoon snack, an organised get together, or for holiday entertaining they are often my go to.
I love that they’re quick and easy to throw together with little to no cooking required, they look impressive and they are so fun to make and eat!
In this video I'll show you how I go about putting it all together to give it the best visual appeal. There are a few tips to think about that will help you as you embark on assembling a board of delicious ingredients!
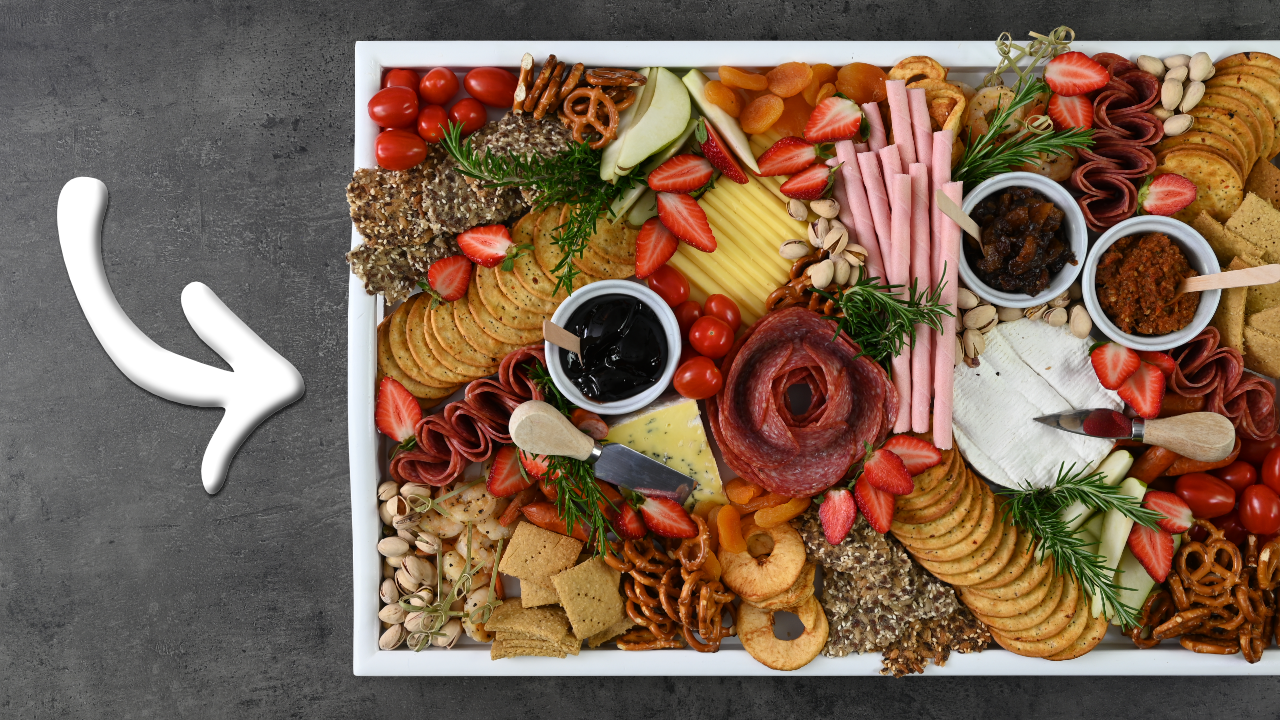
Charcuterie Board
Ingredients:
- Meat options: Salami, cooked prawns, bier sticks
- Cheese selection: French camembert, smoked cheddar, blue cheese
- Cracker selection: Pretzels, meal mates crackers, homemade seed crackers and homemade chickpea crackers
- Accompaniments: Strawberries, cherry tomatoes, fresh pear
- Dips and spreads: Sun-dried tomato pesto, quince jelly, apricot date and ginger chutney
- Sweet element: Strawberry wafer sticks
- Dried apricots and apple rings
- Nuts: Pistachios
- Something to garnish (I used fresh rosemary sprigs)
These are just a few different ideas, but the options are endless - e.g. Pickled vegetables, terrines, chocolates, breads...
Tips for putting your platter together:
- Start with all your ingredients out where you can see them, and if anything needs cutting or preparing make sure that is done before you begin assembling.
- Cutting the cheese allows you to fan it out for visual appeal. This is also a good idea if you don't plan on serving your platter with utensils.
- Once you've chosen your board or platter, create a staring point on your plate or board. I usually start with the cheese as they're not great for filling in the gaps. Then I add any smaller bowls that might have chutney or wetter ingredients in them.
- Remember, an odd number of items looks more pleasing to the eye.
- When arranging the items, remember fanning or folding always looks better. You can inter fold the salami for great visual appeal.
- Make sure your 'stand out' ingredients aren't hidden - use them to create a statement. The salami rose is the central focal point of this platter.
- When assembling your ingredients, make sure you have as much variety as possible - variety in colour, texture, shape, flavour.
- Fill in any gaps with smaller ingredients like the pretzels or nuts.
- Don't forget to finish off the platter by adding a fresh green herb garnish.
- It's best to serve your platter at room temperature, so if you have had it in the fridge, make sure you take it out at least 30 minutes before you want to serve it.
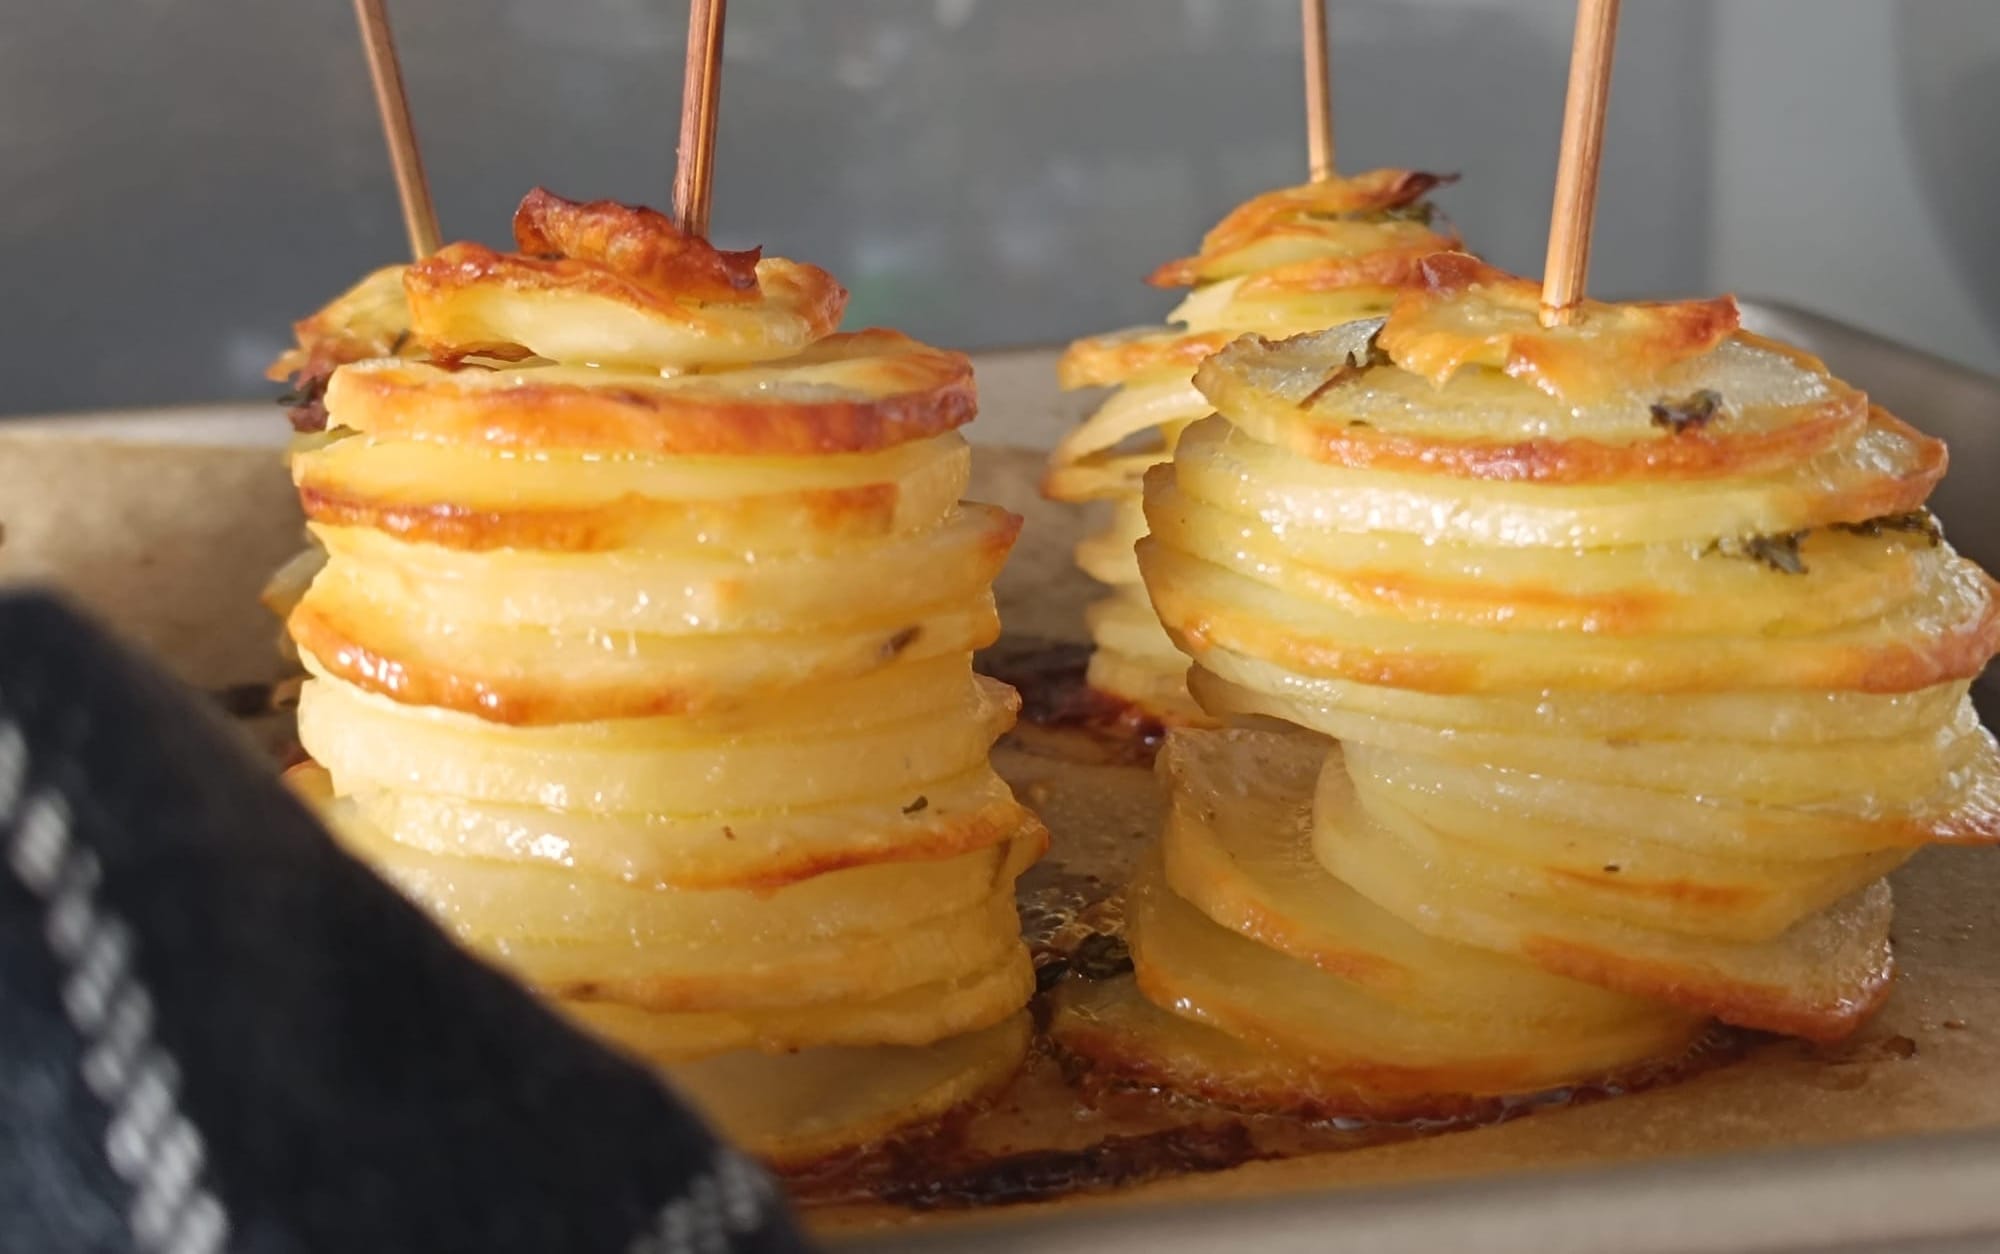
Inspiration From My Kitchen - Layered Potato Stacks
Layered potato stacks are a great option if you want to make a slightly fancier looking 'roast potato' that doesn't require hours of extra time. I mentioned these in a newsletter a couple of weeks ago and a few of you have asked if I could share the recipe. So here it is 😄...
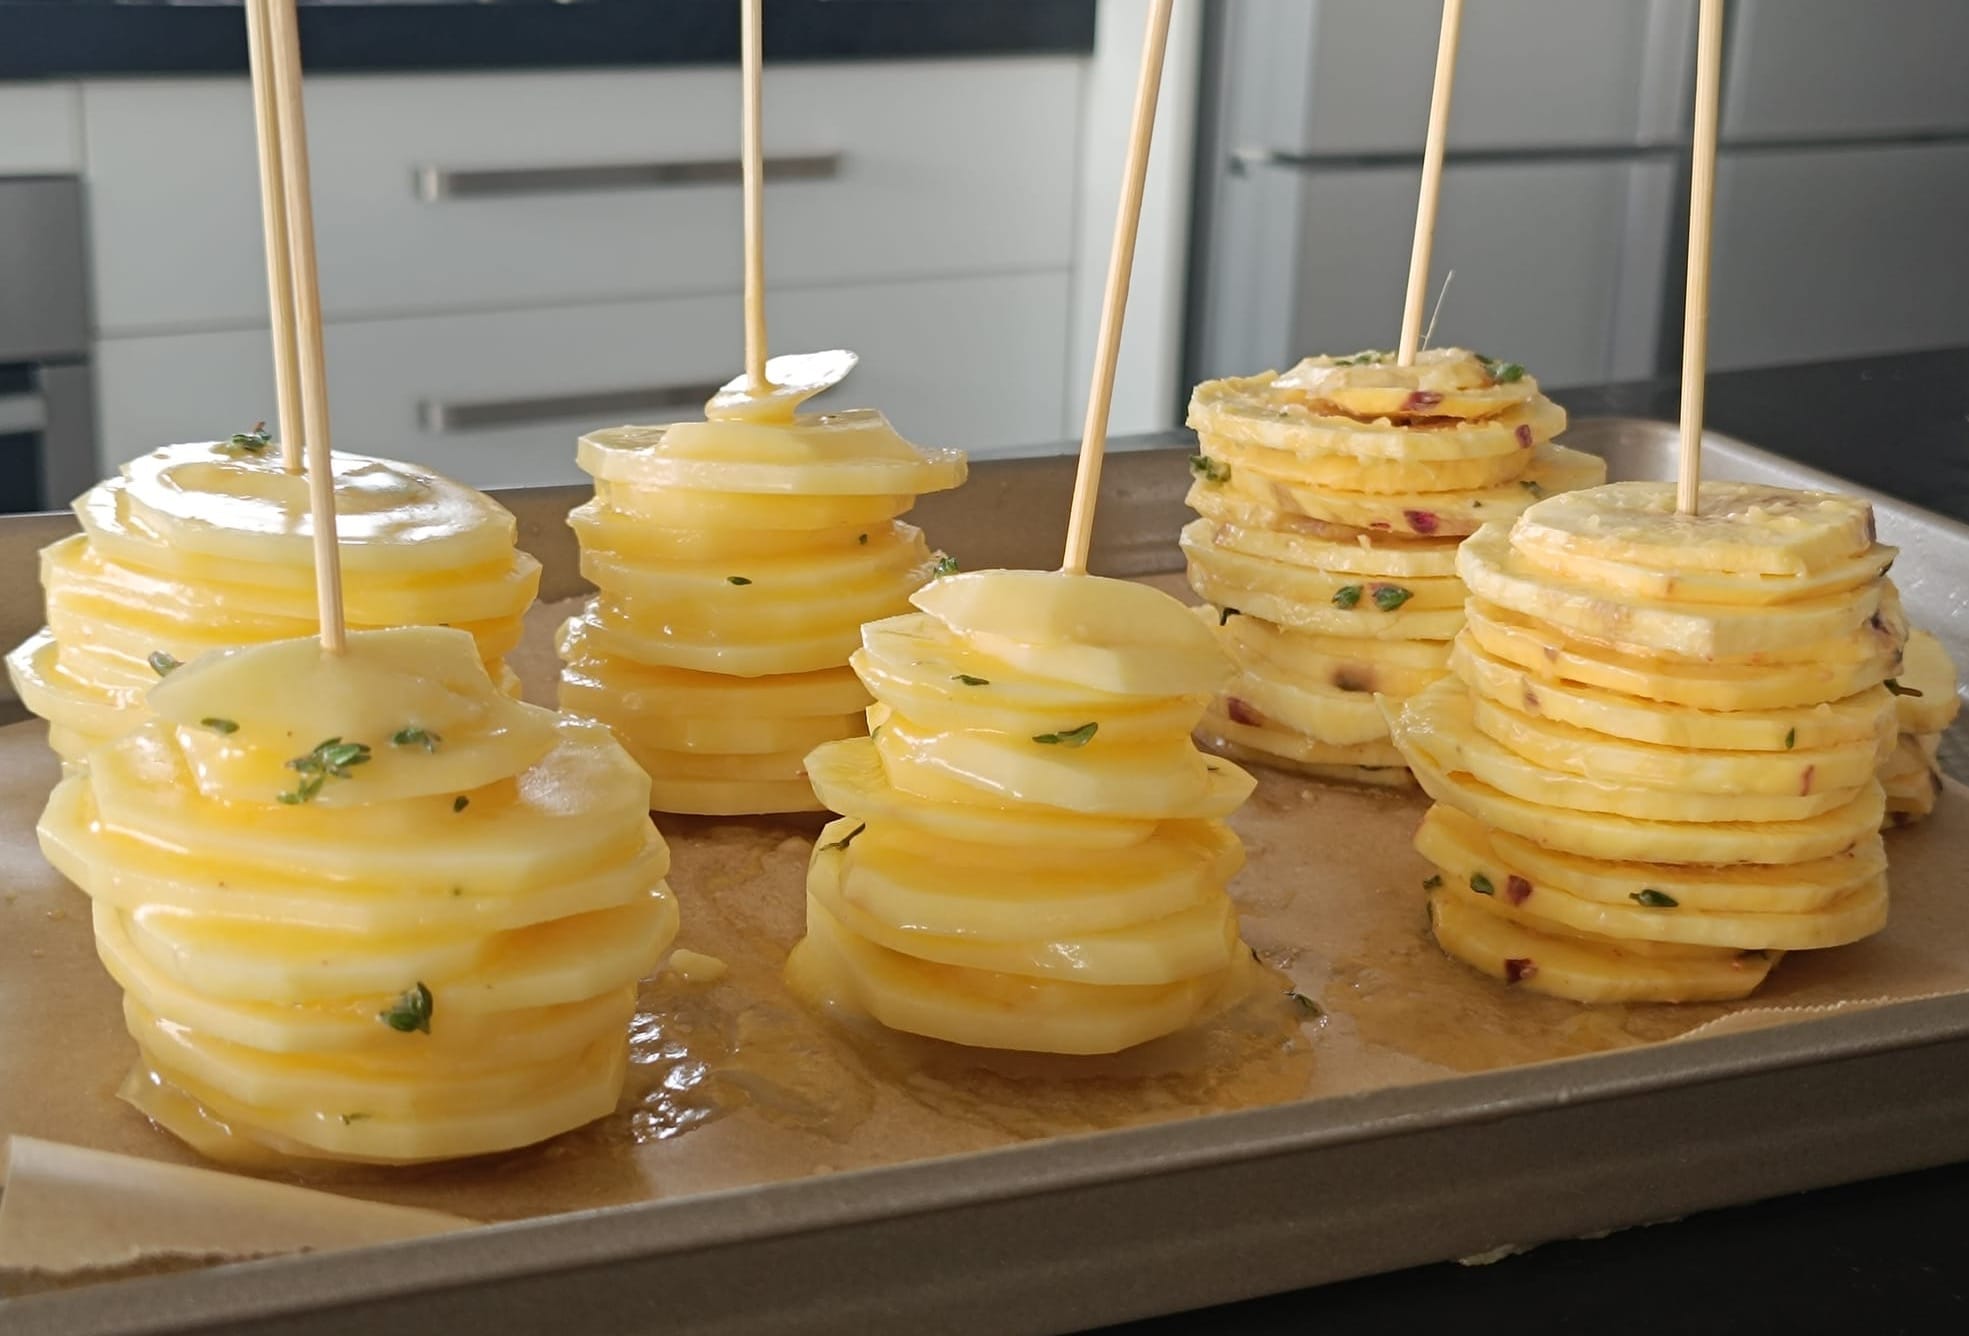
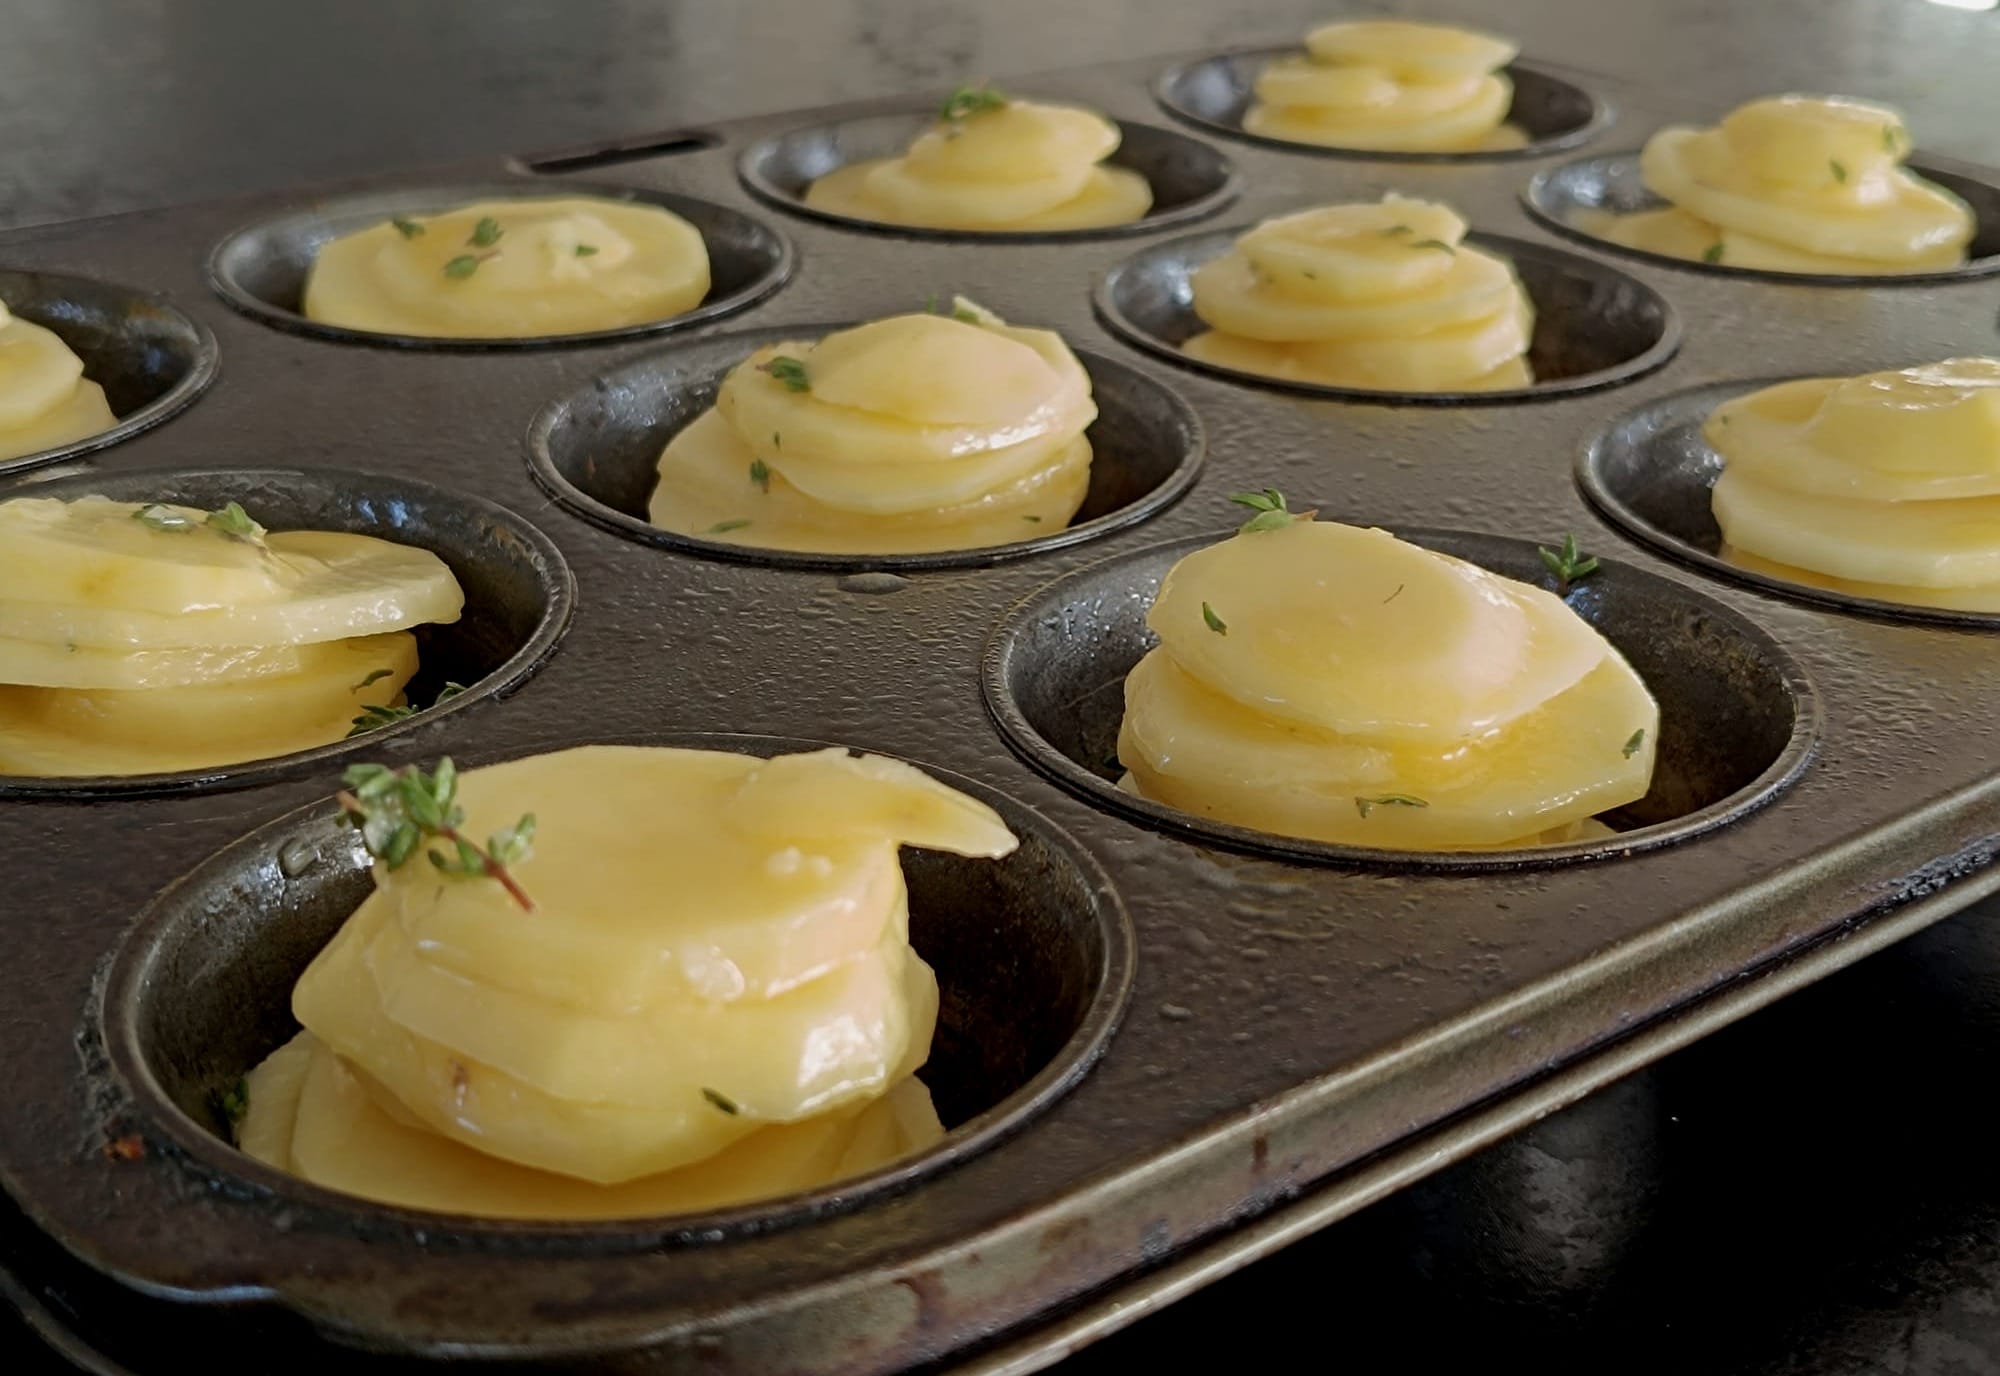
Potato stacks either baked on a tray or in a muffin tin.
I recommend using a mandolin to slice the potatoes (or kumara/sweet potato). It cuts uniform slices and makes it so quick to achieve. Having uniform slices means they will cook evenly. Here's a link to our online shop with the mandolin I use in my kitchen. There's more about our shop below.
If your potatoes are small enough you can stack them into a muffin tin to cook. If your potatoes are quite large you can make stacks on a baking tray and poke a skewer through the centre to hold the stacks together and stop them sliding apart.
Layered Potato Stacks
Ingredients:
Makes 12 small stacks in a muffin tin or 6 larger free standing stacks.
- 8 medium sized potatoes (or kumara/sweet potato)
- 3 tablespoons butter, melted
- 1 1/2 tablespoons oil
- 2 tablespoons fresh thyme, chopped
- 1 teaspoon salt
- 1/2 teaspoon ground black pepper
- 1 clove of garlic, crushed or grated
Method:
- Pre-heat oven to 160 degrees Celsius (320 degrees Fahrenheit).
- Peel the potatoes and thinly slice using a mandolin (approximately 2mm thick).
- Put the sliced potatoes into a large bowl and add the remaining ingredients. Mix well.
- Place stacks of the slices into a lightly sprayed muffin tin and stack up over the top of the rim a little to allow for shrinkage. If the potatoes are too big to fit in the base of the muffin tin make stacks on a baking paper lined oven tray.
- Scoop any remaining liquid over the top of the little stacks.
- Bake for 45 minutes or until they're a golden brown. You can poke them with a skewer to check if they're soft and cooked through. If they're still hard bake them for a bit longer.
- Serve as soon as possible.
Something New - Our Online Shop
We've recently launched our online shop and will be continually updating it with new items. Food presentation doesn't hinge on the equipment you have in your kitchen though; even with basic kitchen tools, you can elevate your dishes.
I'm amazed at all the unnecessary kitchen gadgets available these days - so many of them simply doing what a knife (or other everyday kitchen item) can do! However, certain tools in your kitchen drawer can significantly enhance your efficiency. These are the items we prioritise in our online store. I'll also be sharing items that I use for food presentation - like plates and bamboo skewers etc that I use on our YouTube channel.
As an Amazon Associate I earn from qualifying purchases. The links in our shop are affiliate links to items I use, or to items very similar to what I use in my kitchen. If you click through and make a purchase, I will get a commission at no extra cost to you.
Some people are also interested in the video and photography gear we use to make our videos so we have the links for that too 😄.
 Taryn
Taryn
Have a fantastic week and enjoy being creative in your kitchen!
Happy cooking,
Taryn